This post was written by Matt Kloskowski. For more information on Matt, visit his website at www.mattk.com
There are two huge advantages to shooting tethered directly in to Lightroom:
- Instead of just seeing your images on the tiny screen on the back of your camera, now you can see them full-screen in Lightroom.
- When you see an image you think might work, you can tweak it right there in Lightroom and see the results live.
That means no surprises when you get back from the photoshoot! Here’s a quick guide:
Step One:
Click the File menu and choose Tethered Capture > Start Tethered Capture. The first thing you’ll want to do is give this shoot a name in the Session Name section. Just give it some descriptive name that will help you identify it later. Right under the Session Name box there is a really handy check box, Segment Photos By Shots. If you turn this on, Lightroom will let you segment different photos into different folders, using a specific name.
Step Two:
Next, choose any specific naming that you want to use for these photos. Then under Destination, choose where you’d like to save your photos. This should be whatever drive you use to store your photos on normally. Also, at the very bottom of the dialog, you’ll see where you can add metadata as well as keywords to your photos as you import them.
NOTE: When you’re shooting tethered, your photos go straight to Lightroom and don’t get saved to your camera’s CF card.
Step Three:
At this point you’re ready to move on, so click OK. The Tethered Capture window will open and if your camera is connected you’ll see all of the camera information. On the left, you’ll see the Session Name along with the Shot Name. To the right of that you’ll see the current shutter speed, f/stop, ISO, and white balance setting. You’ll also see Develop Settings on the far right. If you’ve got a Develop preset that you want applied to your photos as you import them, go ahead and choose it here.
Step Four:
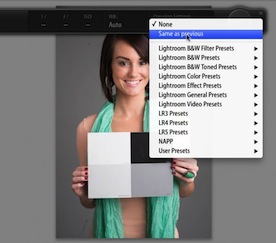
Now you’re ready to start shooting. After you take some photos, give it a few seconds (it’s really fast) and they’ll start to appear in Lightroom. Here’s a great tip though. Let’s say you shoot your subject with a gray card. After the first photo comes into Lightroom, go to the Develop module and use the white balance eyedropper to set the white balance. Then under Develop settings in the Tethered Capture window, choose Same As Previous and all photos that come in will get the same white balance automatically applied.


