Bio: Catherine Slye is a fine art photographer and manages all technical support for Tether Tools. @catslye and online at www.catslye.com.
Before we get begin, I highly suggest going to our Case Air FAQs where you can find app and software downloads, how-to videos and more.
For in-depth out of the box instructions, check out this Tech Tip.
Let’s get started!
You’ll want to charge up the internal battery inside the Case Air prior to using. Same as tethering with a cable – power levels are very important. Start with 100% battery power levels in all three components; Case Air, your camera, and the device you are connecting to – phone, tablet or computer.
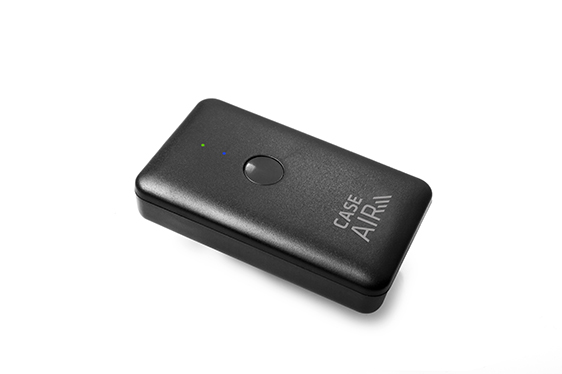
Press and hold the button on the top face. There are two indicator lights.
1.) The blue WiFi indicator light will begin to flash. It is creating the WiFi network when flashing, and the WiFi network is ready to connect when the blue light is solid.
2.) The power level indicator light will begin to flash. It is creating the WiFi network when flashing, and the WiFi network is ready to connect when the blue light is solid.
Start-Up Steps
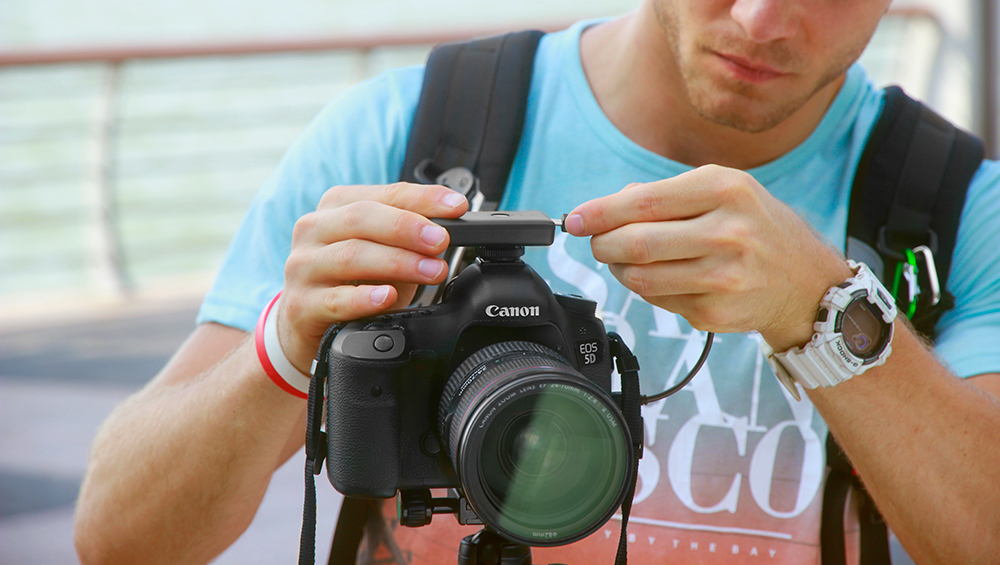
1.) Connect the Case Air to the camera with the supplied USB cable into the camera’s USB data port. Keep the Camera turned Off.
2.) Turn on the Case Air – press and hold the button on the top of the Case Air. The blue light will flicker, then turn to a solid blue light. Once solid, the WiFi network is ready to connect to your device.
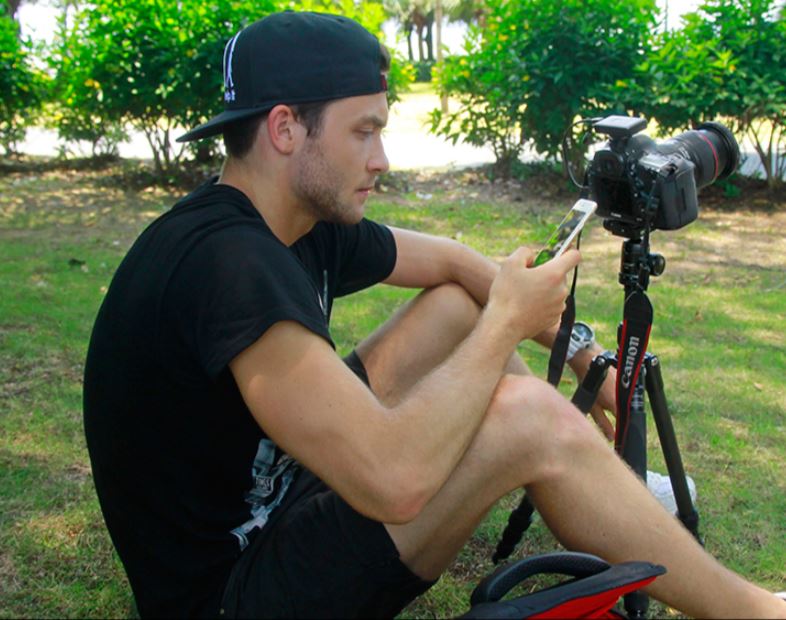
3.) Access the WiFi on your device (phone / tablet / computer), connect to the Case Remote WiFi, enter the password located on the bottom of the Case Air itself. Password is case sensitive.
4.) Open the app or software on your device, you’ll see a message there’s no camera – Now turn on the camera and allow the camera to communicate to the app via the WiFi network, refresh if needed.
We recommend shooting in RAW + JPG small. In the App Settings, turn ON: Auto Thumbnails and RAW Download Ignore. This way, both the RAW and JPG files will save to the card in the camera, but just the JPG thumbnail will transfer to your device for reviewing.
Things to Remember:CASE AIR
Update the firmware – Check Update (in Settings)
Close all other apps, run Case Remote only
Empty the Cache regularly (in Settings)
CAMERA
Fully charge camera battery
Remove WiFi cards and disable any WiFi communications
Insert one memory card in the camera.
Ensure cable connection from the Case Air to the camera USB port.
Check camera for the latest firmware updates.
DEVICE
Fully charge the device – iOS or Android
Disable Bluetooth and Personal Hotspot
Airplane Mode may be necessary
Give/Allow access or permissions to Case Remote
Disable Anti-Virus apps or software – Android or Windows
Disable Google Drive sync or Dropbox sync – iOS, Android, macOS, or Windows
If you are experiencing difficulties connecting the Case Air to a PC or a Mac, first try connecting it to a cell phone and running the firmware update on the Case Air, then try again on your computer. Typically when first connecting you will receive a notification of a firmware update, please update.
Make sure the Case Air is fully charged before updating the firmware – DO NOT turn off the Case Air or the device you are connected to during the firmware update, as this will cause a malfunction. Learn about updating the firmware here.
Questions? Please contact us at customersupport@tethertools.com. We’re here to help!
Contact Us
×
Contact Us
Send us a message and we'll be in touch with you within 1-2 business days.
You can reach us at 1 888-854-65651 888-854-6565 (Monday - Friday 9am to 5pm MST)
Customer Support
This website stores cookies on your computer. These cookies are used to collect information about how you interact with our website and allow us to remember you. We use this information in order to improve and customize your browsing experience and for analytics and metrics about our visitors. Accept
This website uses cookies to improve your experience while you navigate through the website. Out of these, the cookies that are categorized as necessary are stored on your browser as they are essential for the working of basic functionalities of the website. We also use third-party cookies that help us analyze and understand how you use this website. These cookies will be stored in your browser only with your consent. You also have the option to opt-out of these cookies. But opting out of some of these cookies may affect your browsing experience.
Necessary cookies are absolutely essential for the website to function properly. These cookies ensure basic functionalities and security features of the website, anonymously.
Cookie
Duration
Description
cookielawinfo-checkbox-analytics
11 months
This cookie is set by GDPR Cookie Consent plugin. The cookie is used to store the user consent for the cookies in the category "Analytics".
cookielawinfo-checkbox-functional
11 months
The cookie is set by GDPR cookie consent to record the user consent for the cookies in the category "Functional".
cookielawinfo-checkbox-necessary
11 months
This cookie is set by GDPR Cookie Consent plugin. The cookies is used to store the user consent for the cookies in the category "Necessary".
cookielawinfo-checkbox-others
11 months
This cookie is set by GDPR Cookie Consent plugin. The cookie is used to store the user consent for the cookies in the category "Other.
cookielawinfo-checkbox-performance
11 months
This cookie is set by GDPR Cookie Consent plugin. The cookie is used to store the user consent for the cookies in the category "Performance".
viewed_cookie_policy
11 months
The cookie is set by the GDPR Cookie Consent plugin and is used to store whether or not user has consented to the use of cookies. It does not store any personal data.
Functional cookies help to perform certain functionalities like sharing the content of the website on social media platforms, collect feedbacks, and other third-party features.
Performance cookies are used to understand and analyze the key performance indexes of the website which helps in delivering a better user experience for the visitors.
Analytical cookies are used to understand how visitors interact with the website. These cookies help provide information on metrics the number of visitors, bounce rate, traffic source, etc.
Advertisement cookies are used to provide visitors with relevant ads and marketing campaigns. These cookies track visitors across websites and collect information to provide customized ads.
Other uncategorized cookies are those that are being analyzed and have not been classified into a category as yet.
Save & Share Cart
Your Shopping Cart will be saved and you'll be given a link. You, or anyone with the link, can use it to retrieve your Cart at any time.
Back
Save & Share Cart
Your Shopping Cart will be saved with Product pictures and information, and Cart Totals. Then send it to yourself, or a friend, with a link to retrieve it at any time.

 Start-Up Steps
1.) Connect the Case Air to the camera with the supplied USB cable into the camera’s USB data port. Keep the Camera turned Off.
2.) Turn on the Case Air – press and hold the button on the top of the Case Air. The blue light will flicker, then turn to a solid blue light. Once solid, the WiFi network is ready to connect to your device.
3.) Access the WiFi on your device (phone / tablet / computer), connect to the Case Remote WiFi, enter the password located on the bottom of the Case Air itself. Password is case sensitive.
4.) Open the app or software on your device, you’ll see a message there’s no camera – Now turn on the camera and allow the camera to communicate to the app via the WiFi network, refresh if needed.
Start-Up Steps
1.) Connect the Case Air to the camera with the supplied USB cable into the camera’s USB data port. Keep the Camera turned Off.
2.) Turn on the Case Air – press and hold the button on the top of the Case Air. The blue light will flicker, then turn to a solid blue light. Once solid, the WiFi network is ready to connect to your device.
3.) Access the WiFi on your device (phone / tablet / computer), connect to the Case Remote WiFi, enter the password located on the bottom of the Case Air itself. Password is case sensitive.
4.) Open the app or software on your device, you’ll see a message there’s no camera – Now turn on the camera and allow the camera to communicate to the app via the WiFi network, refresh if needed.
 We recommend shooting in RAW + JPG small. In the App Settings, turn ON: Auto Thumbnails and RAW Download Ignore. This way, both the RAW and JPG files will save to the card in the camera, but just the JPG thumbnail will transfer to your device for reviewing.
Things to Remember:
CASE AIR
We recommend shooting in RAW + JPG small. In the App Settings, turn ON: Auto Thumbnails and RAW Download Ignore. This way, both the RAW and JPG files will save to the card in the camera, but just the JPG thumbnail will transfer to your device for reviewing.
Things to Remember:
CASE AIR
 If you are experiencing difficulties connecting the Case Air to a PC or a Mac, first try connecting it to a cell phone and running the firmware update on the Case Air, then try again on your computer. Typically when first connecting you will receive a notification of a firmware update, please update.
Make sure the Case Air is fully charged before updating the firmware – DO NOT turn off the Case Air or the device you are connected to during the firmware update, as this will cause a malfunction. Learn about updating the firmware here.
Questions? Please contact us at customersupport@tethertools.com. We’re here to help!
If you are experiencing difficulties connecting the Case Air to a PC or a Mac, first try connecting it to a cell phone and running the firmware update on the Case Air, then try again on your computer. Typically when first connecting you will receive a notification of a firmware update, please update.
Make sure the Case Air is fully charged before updating the firmware – DO NOT turn off the Case Air or the device you are connected to during the firmware update, as this will cause a malfunction. Learn about updating the firmware here.
Questions? Please contact us at customersupport@tethertools.com. We’re here to help!