Phoenix commercial photographer, Brandon Tigrett produces lifestyle photography for advertising and corporate clients nationwide. His main areas of expertise are in active lifestyle, portrait and headshot photography. Connect with him online at https://brandontigrett.com or on Instagram at @brandontigrett.
Concept
While I was confined to working off a pretty extensive shot list provided by the client, the goal was to help rebrand. In the past Mountainside Fitness had been known as a high-end luxury gym, and through large growth periods over the years, they have let their image veer towards the average commercial gym. My goal was to provide photos that presented the feeling of a high-end lifestyle to working out at Mountainside Fitness. I accomplished this through impactful and clean imagery.
Logistics and Gear
The location was straightforward, the newest Mountainside Fitness in a southern part of Phoenix. We had a shot list that should have been spread out over 3 days, but we accomplished it in one long 13-hour day on set. This was achieved in two ways. Flexible lighting set ups, and an amazing team consisting of two assistants, an art director/graphic designer and the director of marketing from Mountainside Fitness. I’m not sure we could have been efficient enough to complete the lengthy shot list without tethering to Capture One 10. It allowed the art director and director of marketing to review as we shot and signal when it was okay to move onto the next shot on the list.
Another hurdle we faced was the fact that we were not able to shut down the gym while shooting. It was a live gym and we were working around members getting their workouts in. We did our best to turn this into an advantage and make the other gym goers background elements in our shots when applicable.
With a long day ahead of us, it was also important to keep the team well fed. Bagels in the morning and a nice lunch in the afternoon kept us going!
When working inside a facility like this, whether it’s well-lit or dark in the case of the spin class room, using artificial lighting to shape the mood of each shot is key. To do this, I used an arsenal of Profoto lighting gear, including multiple D1 1000w heads, a B1 500w head, Profoto beauty dish and magnum reflector with grids, as well as an Elinchrom 4-foot octa and Lastolite 6×6 scrim.
When it came to achieving the desired look, I chose to go with the Canon 70-200 f/2.8 version II for almost the entire shoot. Luckily it was a spacious gym and I was able to stand back, shooting at longer focal lengths to compress the background elements of the gym, and isolate our subject with a shallow depth of field. This “look” really made for some impactful images with great distraction free areas for copy in the final ads.
Benefits of Tethering
I can’t imagine doing a shoot of this size and importance without tethering. When shooting for billboard and print advertising you’ll almost always be working with an art director on set so tethering is vital. They are there to make sure the what is being shot aligns with the end medium, allowing graphic design enough space for copy and any other important information that needs to be displayed. Another benefit to tethering is the ability for my assistant or tech to check critical focus while shooting. This was very important on this shoot since we had to shoot at 2.8 for most of the shoot to achieve the look that Mountainside Fitness wanted.
Tethering to Capture One 10 made tethering a breeze. There was very little lag time between me shooting and the images appearing on screen for viewing pleasure. Not to mention the ability to apply a simple grade to the images as they come in to get them close to how the final might look. Which brings me to my favorite benefit of tethering. When working long days, 13 hours on set for this shoot, keeping a good energy and morale with the team is so important. There’s nothing like the rush of energy you get when you hear your client in the background getting excited as they see the images appear on screen.
Lighting Set Ups
Shot 1
For the first shot, our main light was a Profoto D1 gelled blue with a gridded magnum reflector on it. We gridded the magnum reflector to avoid any spill onto the background which would pollute the red color. Our second light was a Profoto B1, gelled red, attached to a 4 foot octa. This was positioned camera left and slightly behind our subject providing a contrasting red rim light as well as popping some red onto the wall behind her. The colors of red and blue were chosen to match the neon lighting inside the near pitch black spin room. I decided to make the main light blue because it gave the feeling of being in the dark, as opposed to if it were normal white light it would have felt “flashed” or spotlighted.
Shot 2
Lighting of the second shot was much different. Still an easy two light setup, but this time utilizing three modifiers. I positioned a 6×6 scrim in front of the treadmill our subject would be running at, and behind that was a Profoto B1 with a 4-foot octa attached to it with both layers of diffusion on. For our rim light, I decided to use the Profoto magnum reflector attached to a 1000 watt D1 head. This was positioned very high up close to the ceiling and was gridded to really focus the beam of light on his back. I wanted it to feel like there was a big window right in front of him and a skylight shining down behind him.
Post Processing
The nice thing about tethering was the ability to have my assistant and the art director start culling images as we were shooting. This gave me a good starting point when I got back to my office and helped speed up the process. As mentioned before a lot of these images would be displayed very large so retouching was vital. This involved cleaning up skin and any distractions from the images and applying a nice clean color grade. Some basic adjustments were applied in Capture One before being exported into Photoshop where the bulk of the work was done. Luckily there wasn’t need for any compositing in any of the images.
How I Got the Shot Video with Photographer Brandon Tigrett
How I Got the Shot Guide – Second Edition Download
To download this, and 11 more How I Got the Shot guides, download version 2 of the How I Got the Shot Guide at TetherTools.com. Each educational article features a different image, behind-the-scenes video, as well as a detailed breakdown of how the shot was made.
Contact Us
×
Contact Us
Send us a message and we'll be in touch with you within 1-2 business days.
You can reach us at 1 888-854-65651 888-854-6565 (Monday - Friday 9am to 5pm MST)
Customer Support
This website stores cookies on your computer. These cookies are used to collect information about how you interact with our website and allow us to remember you. We use this information in order to improve and customize your browsing experience and for analytics and metrics about our visitors. Accept
This website uses cookies to improve your experience while you navigate through the website. Out of these, the cookies that are categorized as necessary are stored on your browser as they are essential for the working of basic functionalities of the website. We also use third-party cookies that help us analyze and understand how you use this website. These cookies will be stored in your browser only with your consent. You also have the option to opt-out of these cookies. But opting out of some of these cookies may affect your browsing experience.
Necessary cookies are absolutely essential for the website to function properly. These cookies ensure basic functionalities and security features of the website, anonymously.
Cookie
Duration
Description
cookielawinfo-checkbox-analytics
11 months
This cookie is set by GDPR Cookie Consent plugin. The cookie is used to store the user consent for the cookies in the category "Analytics".
cookielawinfo-checkbox-functional
11 months
The cookie is set by GDPR cookie consent to record the user consent for the cookies in the category "Functional".
cookielawinfo-checkbox-necessary
11 months
This cookie is set by GDPR Cookie Consent plugin. The cookies is used to store the user consent for the cookies in the category "Necessary".
cookielawinfo-checkbox-others
11 months
This cookie is set by GDPR Cookie Consent plugin. The cookie is used to store the user consent for the cookies in the category "Other.
cookielawinfo-checkbox-performance
11 months
This cookie is set by GDPR Cookie Consent plugin. The cookie is used to store the user consent for the cookies in the category "Performance".
viewed_cookie_policy
11 months
The cookie is set by the GDPR Cookie Consent plugin and is used to store whether or not user has consented to the use of cookies. It does not store any personal data.
Functional cookies help to perform certain functionalities like sharing the content of the website on social media platforms, collect feedbacks, and other third-party features.
Performance cookies are used to understand and analyze the key performance indexes of the website which helps in delivering a better user experience for the visitors.
Analytical cookies are used to understand how visitors interact with the website. These cookies help provide information on metrics the number of visitors, bounce rate, traffic source, etc.
Advertisement cookies are used to provide visitors with relevant ads and marketing campaigns. These cookies track visitors across websites and collect information to provide customized ads.
Other uncategorized cookies are those that are being analyzed and have not been classified into a category as yet.
Save & Share Cart
Your Shopping Cart will be saved and you'll be given a link. You, or anyone with the link, can use it to retrieve your Cart at any time.
Back
Save & Share Cart
Your Shopping Cart will be saved with Product pictures and information, and Cart Totals. Then send it to yourself, or a friend, with a link to retrieve it at any time.


 I can’t imagine doing a shoot of this size and importance without tethering. When shooting for billboard and print advertising you’ll almost always be working with an art director on set so tethering is vital. They are there to make sure the what is being shot aligns with the end medium, allowing graphic design enough space for copy and any other important information that needs to be displayed. Another benefit to tethering is the ability for my assistant or tech to check critical focus while shooting. This was very important on this shoot since we had to shoot at 2.8 for most of the shoot to achieve the look that Mountainside Fitness wanted.
Tethering to Capture One 10 made tethering a breeze. There was very little lag time between me shooting and the images appearing on screen for viewing pleasure. Not to mention the ability to apply a simple grade to the images as they come in to get them close to how the final might look. Which brings me to my favorite benefit of tethering. When working long days, 13 hours on set for this shoot, keeping a good energy and morale with the team is so important. There’s nothing like the rush of energy you get when you hear your client in the background getting excited as they see the images appear on screen.
I can’t imagine doing a shoot of this size and importance without tethering. When shooting for billboard and print advertising you’ll almost always be working with an art director on set so tethering is vital. They are there to make sure the what is being shot aligns with the end medium, allowing graphic design enough space for copy and any other important information that needs to be displayed. Another benefit to tethering is the ability for my assistant or tech to check critical focus while shooting. This was very important on this shoot since we had to shoot at 2.8 for most of the shoot to achieve the look that Mountainside Fitness wanted.
Tethering to Capture One 10 made tethering a breeze. There was very little lag time between me shooting and the images appearing on screen for viewing pleasure. Not to mention the ability to apply a simple grade to the images as they come in to get them close to how the final might look. Which brings me to my favorite benefit of tethering. When working long days, 13 hours on set for this shoot, keeping a good energy and morale with the team is so important. There’s nothing like the rush of energy you get when you hear your client in the background getting excited as they see the images appear on screen.
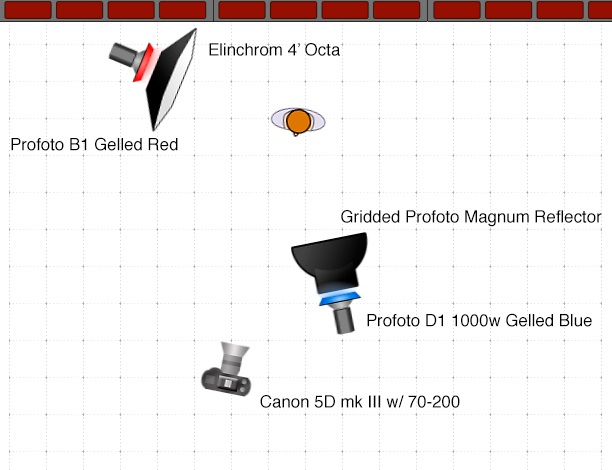 For the first shot, our main light was a Profoto D1 gelled blue with a gridded magnum reflector on it. We gridded the magnum reflector to avoid any spill onto the background which would pollute the red color. Our second light was a Profoto B1, gelled red, attached to a 4 foot octa. This was positioned camera left and slightly behind our subject providing a contrasting red rim light as well as popping some red onto the wall behind her. The colors of red and blue were chosen to match the neon lighting inside the near pitch black spin room. I decided to make the main light blue because it gave the feeling of being in the dark, as opposed to if it were normal white light it would have felt “flashed” or spotlighted.

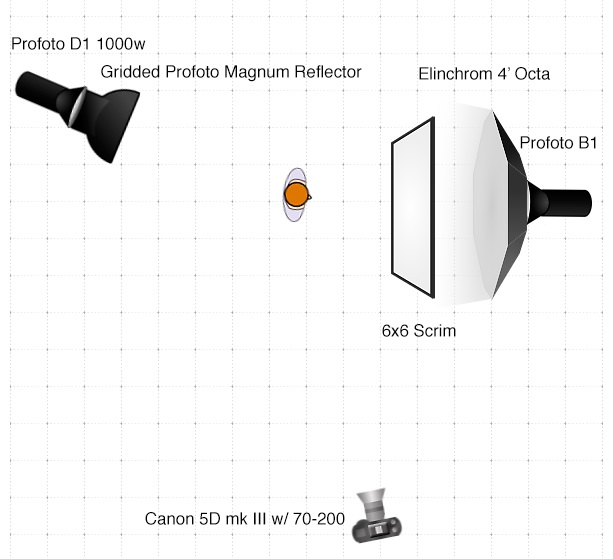 Lighting of the second shot was much different. Still an easy two light setup, but this time utilizing three modifiers. I positioned a 6×6 scrim in front of the treadmill our subject would be running at, and behind that was a Profoto B1 with a 4-foot octa attached to it with both layers of diffusion on. For our rim light, I decided to use the Profoto magnum reflector attached to a 1000 watt D1 head. This was positioned very high up close to the ceiling and was gridded to really focus the beam of light on his back. I wanted it to feel like there was a big window right in front of him and a skylight shining down behind him.

 To download this, and 11 more How I Got the Shot guides, download version 2 of the How I Got the Shot Guide at TetherTools.com. Each educational article features a different image, behind-the-scenes video, as well as a detailed breakdown of how the shot was made.