Product photography can be some of the simplest or most complicated images you can make.
Depending on the item and what the image is for, a simple white tent and a single light are all that’s needed; while other shots can demand every piece of gear and out of the box idea you can throw at it.
Let’s go through step by step to see how to shoot a simple white background product image of a blue plastic cup with a single light and take it from basic to interesting.

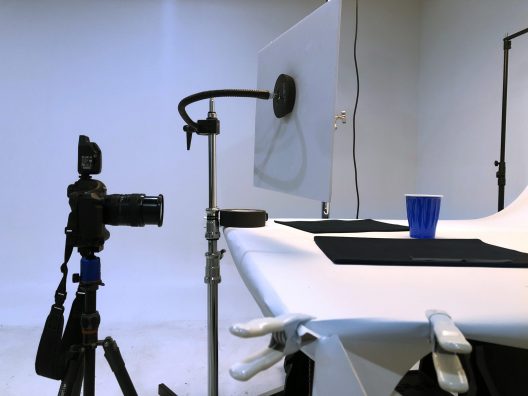
Here’s the basic setup. I have a large softbox directly overhead, illuminating the entire tabletop and background evenly: A large piece of foam board used to bounce an on-camera strobe can work in place of the softbox. The main objective is to make the light source as large as possible and create nice diffuse light so there aren’t any hard-edged shadows.

A light meter reading facing up towards the light gives me a reading of f9. It looks pretty dark. The white paper I’m using for a seamless background isn’t white and the shadows in the molding up the cup are very dark.

A meter reading facing the camera tells me f5 for the front of the cup. It looks too bright, blowing the white highlights on the lip of the cup and bleeding into the white background. I decided to pick an aperture somewhere in-between the two and went with f7.1. At f7.1 I have a nice bright image but preserve the details in the highlights.

A small loop of Gaffers Tape gets applied to the bottom of the cup, to keep in place during the shoot. I wanted to get the highlights and reflections to be even on both sides of the cup, so taping it in place helps keep everything oriented the right way in case the table gets bumped, or the cup gets nudged while I try to move light modifiers around it. Or dropped on top of it. Or both like I did.

This is our base image. Shot at f7.1, it’s a nice evenly lit photo. But there are a few issues that we can fix with just a few more steps. Mainly, the light is very flat and boring. It’s a good exposure and the light is even, but it’s uninteresting. The shape and outline if the molding on the sides are muddy had to see. I also notice that the cup itself is translucent and the light coming into it from overhead is causing it to appear brighter and lighter in color than in other places, depending on the thickness of the plastic and the shape of the molding.

I placed a small black velvet bag inside the cup, making sure it was tucked down below the lip and hidden from the camera. This blocks the light from entering inside the cup and making the blue color on the outside look more even in brightness and color. A black napkin or even a spare sock would work just as well.

It’s a subtle difference between before and after, but will make a difference when we start to add some more shadows. The color and tone of the cup is now even across the whole image. For some products, like liquids in a bottle, this can be a very important detail because light coming from the wrong direction, or simply too much light in general can cause a shift in the color and brightness of the bottle itself and the liquid inside.

The plastic cup is very reflective which I can use to my advantage to add or subtract detail. I placed two pieces of black foam on the tabletop on either side of the cup. The shiny surface of the cup will reflect these dark shapes and add some shadows and contrast to the highlights of the sharp edges of the molding on the sides of the cup.

The black foam creates much more detail and shadow but also reduced the brightness on the cup. So I’m going to place a piece of white foam board directly above the camera, to bounce light from the softbox overhead straight at the side of the cup facing the camera.

The foam board is mounted to an arm on a light stand and adjusted until it is just out of the shot so that it’s nice and low to bounce light on as much of the cup as possible. This reflector will also help add light to the white part of the tabletop just in front of the cup which will add a little uplighting to the area under the rim.

The reflector above the lens does a great job of bringing the overall brightness back up, making the cup just a little brighter than it was before the black foam was added to the tabletop. The highlights are brighter as well, creating some nice contrast and emphasizing the depth of the molded design on the side of the cup.

I liked the dark reflections and shadows that the black foam created so I added even more black foam reflectors to the side, this time standing vertically on each side of the cup. I want to see what it will look like with deeper and darker shadows.

Here you can see how low the white foam board is to the tabletop. I added another piece of black foam just out of frame directly in front of the cup to try and kill the highlights on the front of the cup, but I didn’t like the result.

Since adding more dark tones and shadows made the overall look very dark and killed the contrast and detail, I decided to go the other direction and see what adding brighter highlights would do instead. I replaced the black vertical foam board on left side of the cup with a white foam board the same size and left the black foam on the right. This gave me a half and half look, so I could directly compare them.

I liked the increased brightness in the highlights from replacing the black foam board with white, so I changed the right side as well. The white reflectors brought the overall image brightness up just a little. Because the reflectors are all almost the same distance from the cup , they also created a more even brightness across the entire subject.

This is the final image, with the white foam board reflectors on both sides of the cup, and the white reflector right above the lens. A little bit of curves in Photoshop to add a little extra contrast and we have a nice bright but detailed product photo using a single light. The shape and contours of the molded plastic have nice highlights and shadows to show the depth of the recesses and the crispness of the hard edges, a great improvement over where it started.


