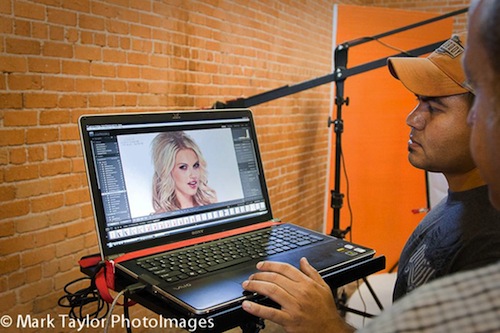
Shooting tethered in the studio or on location is a great way to improve one’s photography and build stronger creative relationships with art directors and clients. Lightroom is a fantastic tool that helps us achieve our creative visions and many of us have come to rely on its ease of use and versatility. But what if your camera isn’t supported by Lightroom for tethered photography? The answer: set up a Watched Folder.
What is a “Watched Folder?” A Watched Folder is a folder one selects on the computer and Lightroom continually monitors. Whenever a new image or video file goes into this folder, the contents automatically populate into the Lightroom catalog. So use a tethering software that supports your camera and let it run in the background. Point both software applications to the same folder and with the Lightroom window up on the computer screen, images will automatically and continually populate into the catalog. Have Lightroom automatically apply presets, keywords and metadata as the images appear.
Set-up is Really Simple. Here’s How to Do It:
The Auto Import feature automatically imports photos into a Lightroom catalog by monitoring a Watched Folder for photos and then importing them into a destination folder in the catalog. After you specify auto-import settings, you can simply drag photos into the watched folder, and Lightroom imports them automatically, allowing you to bypass the import window.
Auto Import is useful if Lightroom doesn’t support your camera for tethered import. You can use third-party software to download photos from your camera to a watched folder.
 If Lightroom starts automatically when you attach a camera or card reader to your computer and you want to turn off this functionality, change your import preferences. See Set import and file-handling preferences.
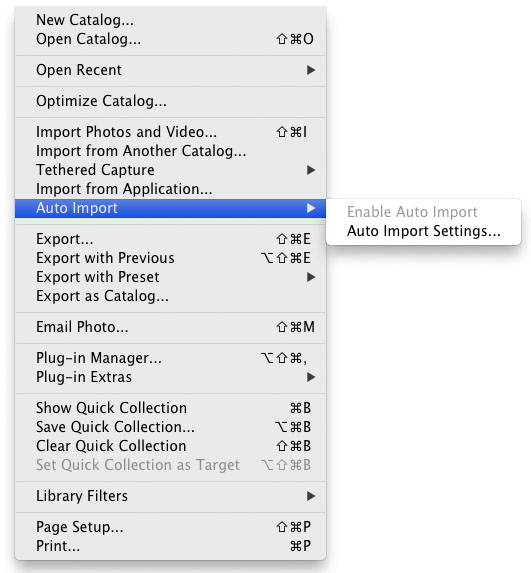
Enable automatically importing photos
- Choose File > Auto Import > Enable Auto Import.
Specify Auto Import settings
-
Choose File > Auto Import > Auto Import Settings.
-
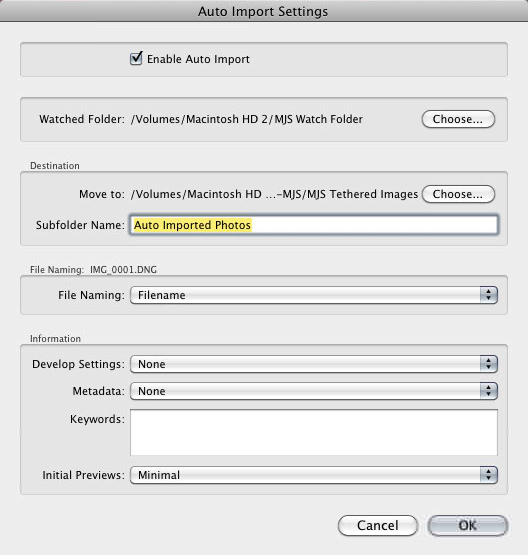
In the Auto Import Settings dialog box, specify any of the following:
- Watched Folder: Choose or create a watched folder where Lightroom detects photos to auto import. The folder you specify must be empty. Auto Import does not monitor sub-folders in a watched folder.
- Destination: Choose or create a folder where the auto-imported photos are moved into.
- File Naming: Name the auto-imported photos. See Naming options.
- Information: Apply Develop settings, metadata, or keywords to auto-imported photos.
- Initial Previews: Have Lightroom render previews of the imported photos rather than only using the embedded previews in the photo files. See Specify initial previews when importing.
Set up watched folders
- In the Auto Import Settings dialog box, click the Choose button next to Watched Folder.
- Navigate to the location you want and do any of the following:
-
To create a watched folder, click Make New Folder and then overwrite New Folder to give the folder a name (Windows), or click New Folder (Mac OS), give the folder a name, and click Create.
-
To select an existing watched folder, select the folder.
Note: You cannot choose an existing folder that contains photos as a watched folder. -
- Click OK (Windows) or Choose (Mac OS).
Select a destination folder for auto-imported photos
When Lightroom detects photos added to a watched folder, the photos are moved into a destination folder and automatically imported into the library.
- In the Destination area of the Auto Import Settings dialog box, click the Choose button beside Move To.
- In the Browse For Folders (Windows) or Open (Mac OS) dialog box, navigate to the location you want, and do any of the following:
-
To create a destination folder, click Make New Folder and then overwrite New Folder to give the folder a name (Windows), or click New Folder, give the folder a name, and click Create (Mac OS).
-
To select an existing destination folder, select the folder.
-
- Click OK (Windows) or Choose (Mac OS).
- (Optional) Type a name for the destination folder in the Subfolder Name text box.
Apply Develop settings and metadata to auto-imported photos
 In the Information area of the Auto Import Settings dialog box, do any of the following:
-
To apply Develop settings to auto-imported photos, choose a preset from the Develop Settings menu. See Create and apply Develop presets.
-
To apply metadata to auto-imported photos, choose a preset from the Metadata menu. See Create a metadata preset.
-
To apply keywords to auto-imported photos, type in the Keywords text box. Use commas to separate the keywords.
-
To have Lightroom render previews of the imported photos rather than only using the embedded previews in the photo files, choose Initial Previews > Standard.
source: adobe