Photographers know the importance of color. If you’re shooting tethered, then you’ve made the choice to create a workflow that enables you to see your image in larger detail. Your display is your window into your digital world and you need to be able to trust what you see. In the end, it comes down to quality control and the responsibility to deliver consistent quality work to your clients.
If you want to view your photos in their best light, or view other photographers’ creations as intended, you’ll want to calibrate your display. If you’re an advanced hobbyist, a professional photographer, film maker, designer or anyone who relies on a screen as part of their work, you should use an automated display calibration system.
Relatively affordable, dedicated hardware exists to ensure true color; one such option is Datacolor’s Spyder5PRO.
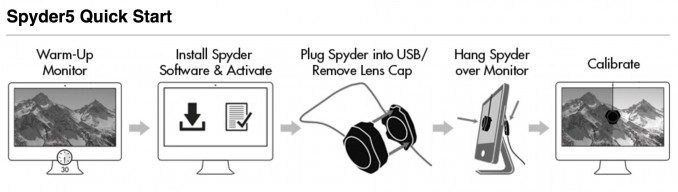
Setting up the Spyder5PRO is foolproof and takes just a few minutes. Calibrating your monitor should be the first thing you do when you walk on a set or on location. If you’re shooting in-studio, we recommend calibrating once a month. In both circumstances keep the Spyder5Pro connected to monitor the brightness of your screen depending on your lighting environment.
What is a Datacolor Spyder5Pro?
The Spyder5PRO colorimeterccurately measures the color, brightness, white point and tone response of your display during calibration. The calibration software then takes the measurements from the sensor to create a display profile that corrects for any variations from the desired output. This profile is loaded every time you start your computer so you are always looking at a color corrected screen.
How to Calibrate Your Screen
First, the Spyder5PRO will measure the ambient light in the room using its ambient light sensor on the top of the device. For best results, you’ll want to leave the Spyder5PRO connected all the time and so the Spyder5PRO can warn you when the ambient light changes enough to warrant a recalibration. While the Spyder5PRO is going through its setup, measuring the ambient light in-studio or on location, don’t walk away – if you’re blocking light, you want the sensor to pick that up. Placing the Spyder next to your keyboard as shown is best.
After the ambient light setup, your monitor is ready for calibration. The full calibration process takes approximately five minutes, but future calibrations are quicker at just a few minutes using the ReCAL option.
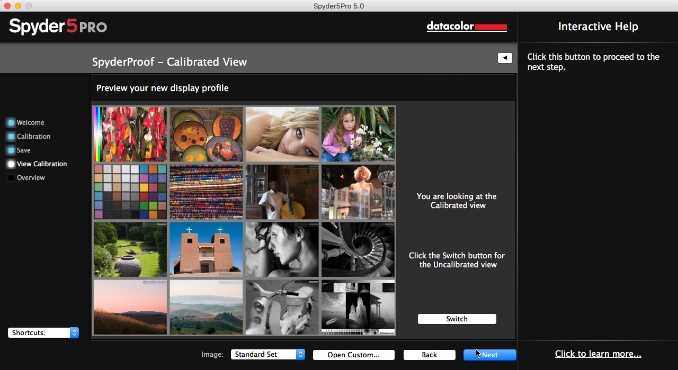
The display calibration process is relatively straightforward with a step-by-step wizard that walks you through the process. We recommend using the default settings, but if you are particular about the calibration of your displays, there are a number of advanced features including setting a particular color temperature, gamma point, and brightness.
After you’ve completed your color calibration leave the colorimeter attached on your desk or Tether Table Aero. The Spyder5PRO and its unobtrusive app stays running in the background. Together they monitor the ambient light levels and will alert you if there’s been a change that might impact color accuracy.
Final Thoughts on the Spyder5PRO
The Spyder5 PRO was easy to set up; simply follow the prompts, let it do its thing and then see the results. Spyder5PRO users have reported their displays are more true to life, have better consistency between displays and can make prints that match their displays. Many call it the best investment they’ve ever made.
In using the Spyder5PRO we were impressed with how easy it was to use and how solidly it is made.
Contact Us
×
Contact Us
Send us a message and we'll be in touch with you within 1-2 business days.
You can reach us at 1 888-854-65651 888-854-6565 (Monday - Friday 9am to 5pm MST)
Customer Support
This website stores cookies on your computer. These cookies are used to collect information about how you interact with our website and allow us to remember you. We use this information in order to improve and customize your browsing experience and for analytics and metrics about our visitors. Accept
This website uses cookies to improve your experience while you navigate through the website. Out of these, the cookies that are categorized as necessary are stored on your browser as they are essential for the working of basic functionalities of the website. We also use third-party cookies that help us analyze and understand how you use this website. These cookies will be stored in your browser only with your consent. You also have the option to opt-out of these cookies. But opting out of some of these cookies may affect your browsing experience.
Necessary cookies are absolutely essential for the website to function properly. These cookies ensure basic functionalities and security features of the website, anonymously.
Cookie
Duration
Description
cookielawinfo-checkbox-analytics
11 months
This cookie is set by GDPR Cookie Consent plugin. The cookie is used to store the user consent for the cookies in the category "Analytics".
cookielawinfo-checkbox-functional
11 months
The cookie is set by GDPR cookie consent to record the user consent for the cookies in the category "Functional".
cookielawinfo-checkbox-necessary
11 months
This cookie is set by GDPR Cookie Consent plugin. The cookies is used to store the user consent for the cookies in the category "Necessary".
cookielawinfo-checkbox-others
11 months
This cookie is set by GDPR Cookie Consent plugin. The cookie is used to store the user consent for the cookies in the category "Other.
cookielawinfo-checkbox-performance
11 months
This cookie is set by GDPR Cookie Consent plugin. The cookie is used to store the user consent for the cookies in the category "Performance".
viewed_cookie_policy
11 months
The cookie is set by the GDPR Cookie Consent plugin and is used to store whether or not user has consented to the use of cookies. It does not store any personal data.
Functional cookies help to perform certain functionalities like sharing the content of the website on social media platforms, collect feedbacks, and other third-party features.
Performance cookies are used to understand and analyze the key performance indexes of the website which helps in delivering a better user experience for the visitors.
Analytical cookies are used to understand how visitors interact with the website. These cookies help provide information on metrics the number of visitors, bounce rate, traffic source, etc.
Advertisement cookies are used to provide visitors with relevant ads and marketing campaigns. These cookies track visitors across websites and collect information to provide customized ads.
Other uncategorized cookies are those that are being analyzed and have not been classified into a category as yet.
Save & Share Cart
Your Shopping Cart will be saved and you'll be given a link. You, or anyone with the link, can use it to retrieve your Cart at any time.
Back
Save & Share Cart
Your Shopping Cart will be saved with Product pictures and information, and Cart Totals. Then send it to yourself, or a friend, with a link to retrieve it at any time.

 Photographers know the importance of color. If you’re shooting tethered, then you’ve made the choice to create a workflow that enables you to see your image in larger detail. Your display is your window into your digital world and you need to be able to trust what you see. In the end, it comes down to quality control and the responsibility to deliver consistent quality work to your clients.
If you want to view your photos in their best light, or view other photographers’ creations as intended, you’ll want to calibrate your display. If you’re an advanced hobbyist, a professional photographer, film maker, designer or anyone who relies on a screen as part of their work, you should use an automated display calibration system.
Relatively affordable, dedicated hardware exists to ensure true color; one such option is Datacolor’s Spyder5PRO.
Setting up the Spyder5PRO is foolproof and takes just a few minutes. Calibrating your monitor should be the first thing you do when you walk on a set or on location. If you’re shooting in-studio, we recommend calibrating once a month. In both circumstances keep the Spyder5Pro connected to monitor the brightness of your screen depending on your lighting environment.
Photographers know the importance of color. If you’re shooting tethered, then you’ve made the choice to create a workflow that enables you to see your image in larger detail. Your display is your window into your digital world and you need to be able to trust what you see. In the end, it comes down to quality control and the responsibility to deliver consistent quality work to your clients.
If you want to view your photos in their best light, or view other photographers’ creations as intended, you’ll want to calibrate your display. If you’re an advanced hobbyist, a professional photographer, film maker, designer or anyone who relies on a screen as part of their work, you should use an automated display calibration system.
Relatively affordable, dedicated hardware exists to ensure true color; one such option is Datacolor’s Spyder5PRO.
Setting up the Spyder5PRO is foolproof and takes just a few minutes. Calibrating your monitor should be the first thing you do when you walk on a set or on location. If you’re shooting in-studio, we recommend calibrating once a month. In both circumstances keep the Spyder5Pro connected to monitor the brightness of your screen depending on your lighting environment.
 After the ambient light setup, your monitor is ready for calibration. The full calibration process takes approximately five minutes, but future calibrations are quicker at just a few minutes using the ReCAL option.
The display calibration process is relatively straightforward with a step-by-step wizard that walks you through the process. We recommend using the default settings, but if you are particular about the calibration of your displays, there are a number of advanced features including setting a particular color temperature, gamma point, and brightness.
After you’ve completed your color calibration leave the colorimeter attached on your desk or Tether Table Aero. The Spyder5PRO and its unobtrusive app stays running in the background. Together they monitor the ambient light levels and will alert you if there’s been a change that might impact color accuracy.
After the ambient light setup, your monitor is ready for calibration. The full calibration process takes approximately five minutes, but future calibrations are quicker at just a few minutes using the ReCAL option.
The display calibration process is relatively straightforward with a step-by-step wizard that walks you through the process. We recommend using the default settings, but if you are particular about the calibration of your displays, there are a number of advanced features including setting a particular color temperature, gamma point, and brightness.
After you’ve completed your color calibration leave the colorimeter attached on your desk or Tether Table Aero. The Spyder5PRO and its unobtrusive app stays running in the background. Together they monitor the ambient light levels and will alert you if there’s been a change that might impact color accuracy.